Alright. For those of you who have been asking... a DRESS TUTORIAL! I most likely won't ever do this again because it took twice as long to write everything down and try to have it make sense for other people to read! I also don't ever use patterns so no two things I make are alike. I've once used a friend's kid's diaper as a size reference since I was sewing after Carrie was already in bed.... I'm very much a fly-by-the-seat-of-my-pants sewer.
Do you all remember the painter guy with the afro who you used to watch on TV? Didn't you always swear that somewhere in the middle he made an irreversible mistake that completely ruined the picture? But somehow it turned out looking nice in the end?...
This totally describes almost all of my sewing projects. I make it up as I go, and usually end up having to tweak and re-tweak things after-the-fact so they look or fit better. Hence, tutorials are difficult for me to write.
**My apologies in advance to those who may end up confused by this tutorial. It's my first (and probably only) try at doing one. Good luck!
This is the CARRIE CANDY CORN DRESS, making an appearance just in time for Halloween (which happens to be on a Sunday this year, so she needed something festive to wear to church)
1. Find a dress that already fits "your girl". Use this as a pattern for length, collar, and arm holes when cutting your fabric.
The white of a candy corn is the smallest tip part, hence it is the bodice of this dress. The orange takes up most of the middle and the very edge is yellow. I eyeballed the white-to-orange-to-yellow ratio to match the length of the dress I was using as a pattern.
If you really wanted to, you could use plain colors. I thought a little bit of pattern was more fun.
2. When cutting pieces, make sure you allow about 1/2 inch extra on each piece for seam and also a little more extra length. By the time you put it all together, the ruffle makes the dress appear shorter than you thought (I learned this the hard way)
The bodice (white) should be a normal fit, matching your "pattern dress" perfectly. You will need (4) of them. *Front and back with full lining*
The orange should be a long wide rectangle measuring 3 times the width of the bodice.
The yellow should be 3 times the width of the orange.
An example of what your pieces might look like right after you cut them out. (My orange and yellow pieces are folded in half in this pic so everything would fit easier. They are actually much wider than they look)
3. Stitch two bodice pieces together (ie; front to lining)
Do NOT stitch the bodice bottom. This will allow you a place to flip it right-side-out in a minute.
Also, to reduce shoulder bulk later, do NOT stitch the shoulder tops together either.
Sides, armholes and collar only :)
Repeat with remaining two bodice pieces (ie; back and lining)
4. Flip both pieces right side out and sew front and back together along sides and shoulder tops.
Flip so seams are on the inside, and topstitch around arm holes and collar.
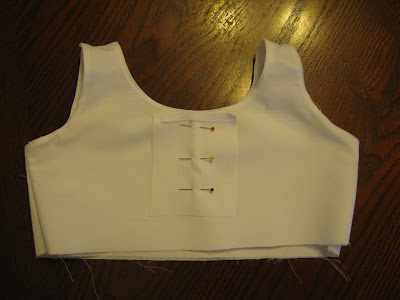
5. Cut a small rectangle (white) about 2/3 the length of the bodice and about 2 inches wide.
6. Do a quick-hem to one of the short sides of the rectangle. Pin the small rectangle to the back of the bodice, right sides together.
7. Cut down the center about 2 inches. You will be cutting through the small rectangle and both layers of the back piece.
8. Pin a small loop of skinny elastic/ribbon/rope between back and small rectangle.
9. Sew a straight stitch on both sides of the newly cut "slit"
10. Flip the small rectangle piece through the slit so it's now on the inside of the bodice.
Topstitch around slit. This will secure the small rectangle so it stays on the inside.
Now, the point of the last several steps.... Tah-dah! A beautiful, finished button hole closure in the back
The bodice is done, pat yourself on the back. At this point you might also want to allow yourself a small reward. A cookie or something.
Yummy :) Now back to business!
11. Run a gathering stitch along one looooong side of the orange piece.
12. Gather until the width matches the width of the bodice bottom (plus 1/2 inch for seam)
13. Stitch right sides of orange together to make a "ring"
14. Pin right sides of bodice and orange together and stitch.
15. Flip right-side-out. Fold seam so it's laying toward bodice and topstitch. (This helps the ruffle seam lay flatter)
***Repeat steps 11-15 with yellow-to-orange***
Note: My yellow piece actually took 4 separate strips of fabric to make it the right (very long) length. If your pieces are like this too, sew them all to each other FIRST. You should be running a gather stitch along one very very long piece of fabric, not several separate strips
16. Double fold and hem bottom of dress.
17. Iron the whole dress.
*Ruffles are a little tricky to iron. Use very very short strokes, moving the fabric as you go. You want to try to avoid actually ironing creases into the ruffle. Basically, life is easier without ironing, but it sure makes everything look prettier!
19. Hand sew bow, button, or something else small and decorative on bodice top
20. CONGRATS! You're all done! Grab your little cutie and make her try on this dang cute halloween dress!! (I'm pretty sure another cookie is justified at this point!)
Friday, October 22, 2010
The Carrie Candy Corn Dress
Subscribe to:
Post Comments (Atom)


5 comments:
That is super cute. I need to have someone teach me how to do a gathering stitch on my sewing machine.
I think it made sense you shouldnt give up on writing it out. It turned out great!
I so wish I had a little girl so I could make a dress like that! The whole Candy Corn idea is so cute! and you did a good job writing the tutorial.. I totally understood it!
You should know that I am in love with this dress and have made it in several varieties including your candy corn one and a 4th of July one which I am posting on my blog this week! Love it!
Amber
www.crazylittleprojects.com
This is adorable! Thanks so much! I have been looking for a tutorial for a candy cane dress for my daughter (at school on Halloween she cannot wear her costume...but this is perfect!). I too wing it when it comes to sewing...:) thanks again!! Cari
Post a Comment